FreeSWITCH
Before placing or receiving a call, ensure you have an active phone number and a SIP account created on your didlogic account.
Digest Authentication
-
Create a file didlogic.xml in external SIP profiles: freeswitch/conf/sip_profiles/external/didlogic.xml
<include>
<gateway name="didlogic">
<param name="username" value="73253"/>
<param name="password" value="YOUR_SIP_ACCOUNT_PASSWORD"/>
<param name="realm" value="sip.***.didlogic.net"/>
<param name="register" value="true"/>
<param name="context" value="didlogic"/>
</gateway>  </include>
sip.***.didlogic.net - instead of *** please select one of didlogic regional SIP gateways. You can find a full list of our regional gateways here. We recommend selecting a regional gateway with the lowest latency from your public IP address.

- Once you have created a file, remember to grant access to FreeSWITCH so that it can use it:
root@freeswitch:/usr/local/freeswitch/conf/sip_profiles/external/# chown freeswitch:freeswitch didlogic.xml
Creating a Dialplan
-
Create a
didlogic_dialplan.xmlfile in the dialplan directory:usr/local/freeswitch/conf/dialplan/didlogic_dialplan.xml<?xml version="1.0" encoding="UTF-8"?>
<include>
<context name="didlogic">
<extension name="unloop">
<condition field="$${unroll_loops}" expression="^true$" />
<condition field="${sip_looped_call}" expression="^true$">
<action application="deflect" data="${destination_number}" />
</condition>
</extension>
<extension name="in-didlogic">
<condition field="destination_number" expression="^(61272534418)$">
<action application="bridge" data="user/1000@$${domain}"/>
<action application="hangup"/>
</condition>
</extension>
<extension name="out-didlogic">
<condition field="destination_number" expression="^(\d{10,15})$">
<action application="bridge" data="sofia/gateway/didlogic/$1"/>
<action application="export" data="sip_from_uri=${sip_from_uri}"/>
<action application="hangup"/>
</condition>
</extension>
<extension name="local">
<condition field="destination_number" expression="^\d{4}$">
<action application="answer" />
<action application="sleep" data="1000" />
<action application="bridge" data="user/${destination_number}@$${domain}" />
<action application="hangup" />
</condition>
</extension>
</context>
</include>
-
Condition "destination_number" in the section "in-didlogic" contains a regular expression matching DID
number you have purchased: "^(61272534418)$" -
Condition "destination_number" in the section "out-didlogic" contains a regular expression matching
PSTN numbers you will be calling from FreeSWITCH: "^(\d15)$" -
Grant access to the
didlogic_dialplan.xmlfile so FreeSWITCH can read it.
-
Edit the configuration file of the internal number, assigned to the phone:
root@freeswitch:/usr/local/freeswitch/conf/directory/default# nano 1000.xml<include>
<user id="1000">
<params>
<param name="password" value="YOUR_EXTENSION_PASSWORD"/>
<param name="vm-password" value="1000"/>
</params>
<variables>
<variable name="toll_allow" value="domestic,international,local"/>
<variable name="accountcode" value="1000"/>
<variable name="user_context" value="didlogic"/>
<variable name="effective_caller_id_name" value="CALLER_ID_NAME"/>
<variable name="effective_caller_id_number" value="61272534418"/>
<variable name="outbound_caller_id_name" value="$${outbound_caller_name}"/>
<variable name="outbound_caller_id_number" value="$${outbound_caller_id}"/>
<variable name="callgroup" value="techsupport"/>
</variables>
</user>
</include>
The value of the <variable name="user_context" value="didlogic"/> parameter must match the
gateway name you created in the external SIP profile.
-
Set RTP ports parameters to 10000-20000 in the global configuration file switch.conf.xml:
usr/local/freeswitch/conf/autoload_configs/switch.conf.xml<param name="rtp-start-port" value="10000"/>
<param name="rtp-end-port" value="20000"/> -
For FreeSWITCH to reread the configuration files, the
fs_cli -x reloadxmlcommand should be executed. -
Once the configuration is completed, you can verify SIP Account registration using the
sofia status gateway <gateway-name>command in the fs_cli command prompt: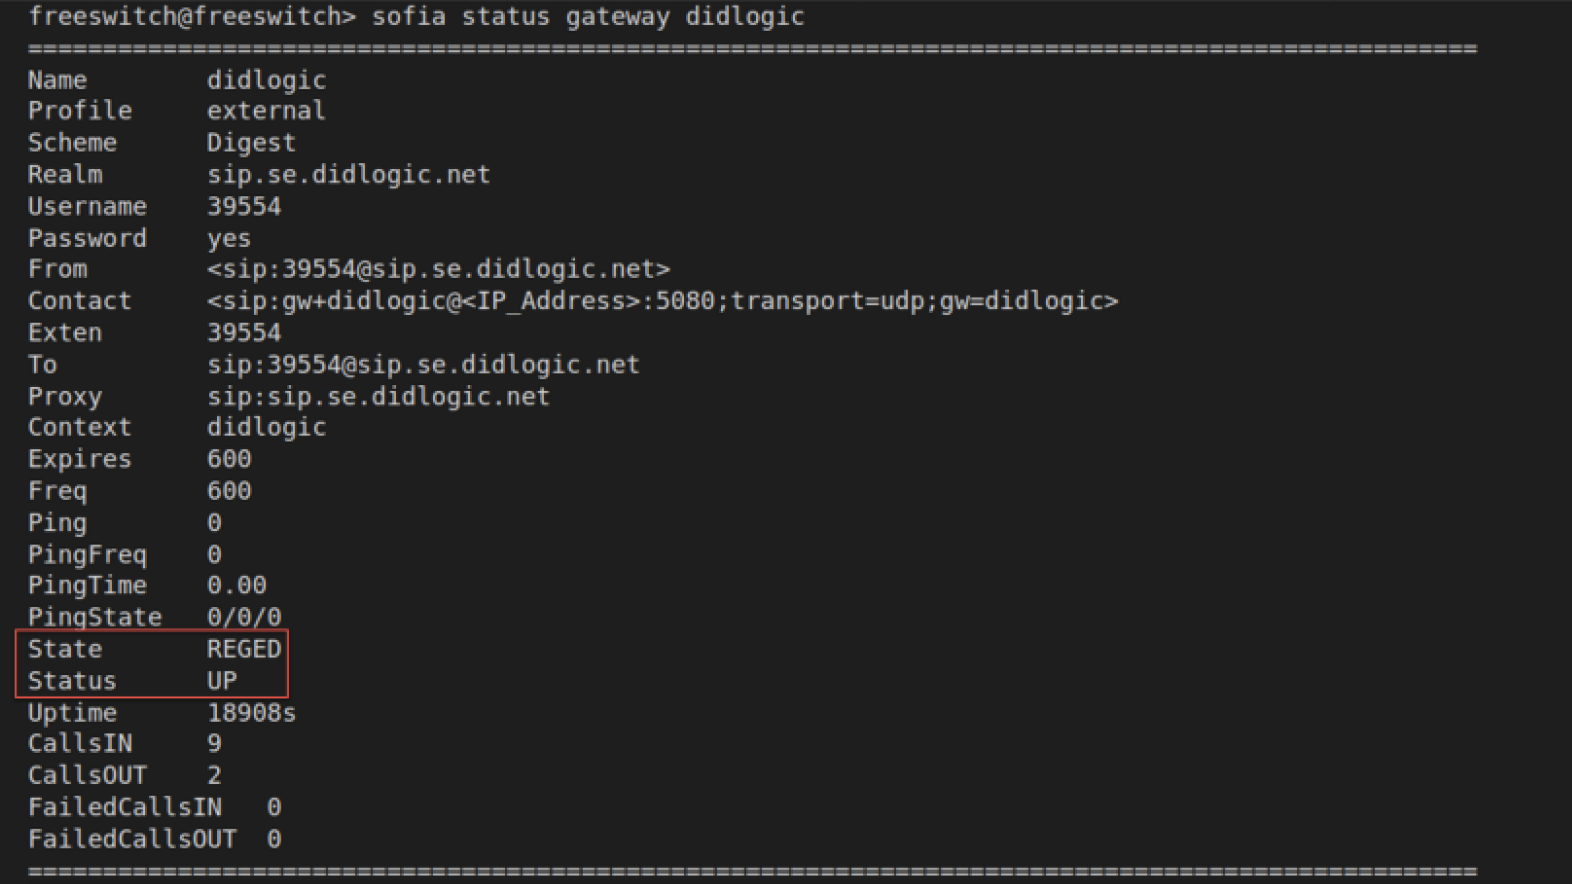
If registration is successful, you will see 'REGED' in the "State" column. Please note that if the SIP gateway is not registered, incoming calls will not be routed to your FreeSWITCH.
IP Authentication
You can enable IP Authentication for your SIP Account. In this case didlogic gateway will accept all outbound calls from the IP address you specify without further authentication. To set up IP Authentication, please contact support at [email protected] and provide the public IP Address you will be sending outbound calls from.
SIP Accounts with IP Authentication enabled cannot be used as the destination assigned to DIDs on the portal. SIP URI addresses must be used instead.
Steps to configure incoming call routing to the SIP URI:
-
Log in to your didlogic account.
-
Go to the PURCHASED tab and click Edit.
-
Select SIP URI from the drop-down list in the "Forward to:" field.
-
Enter a valid SIP URI using the following format:
+[did]@<Destination>:port;transport=type, where:- Destination is the fully qualified domain name or IP address of your FreeSWITCH.
- The port is the SIP connection port used by FreeSWITCH.
- The type could be either udp, tcp, or tls. The default transport is UDP.
-
Click Add to set up the destination for the DID number.
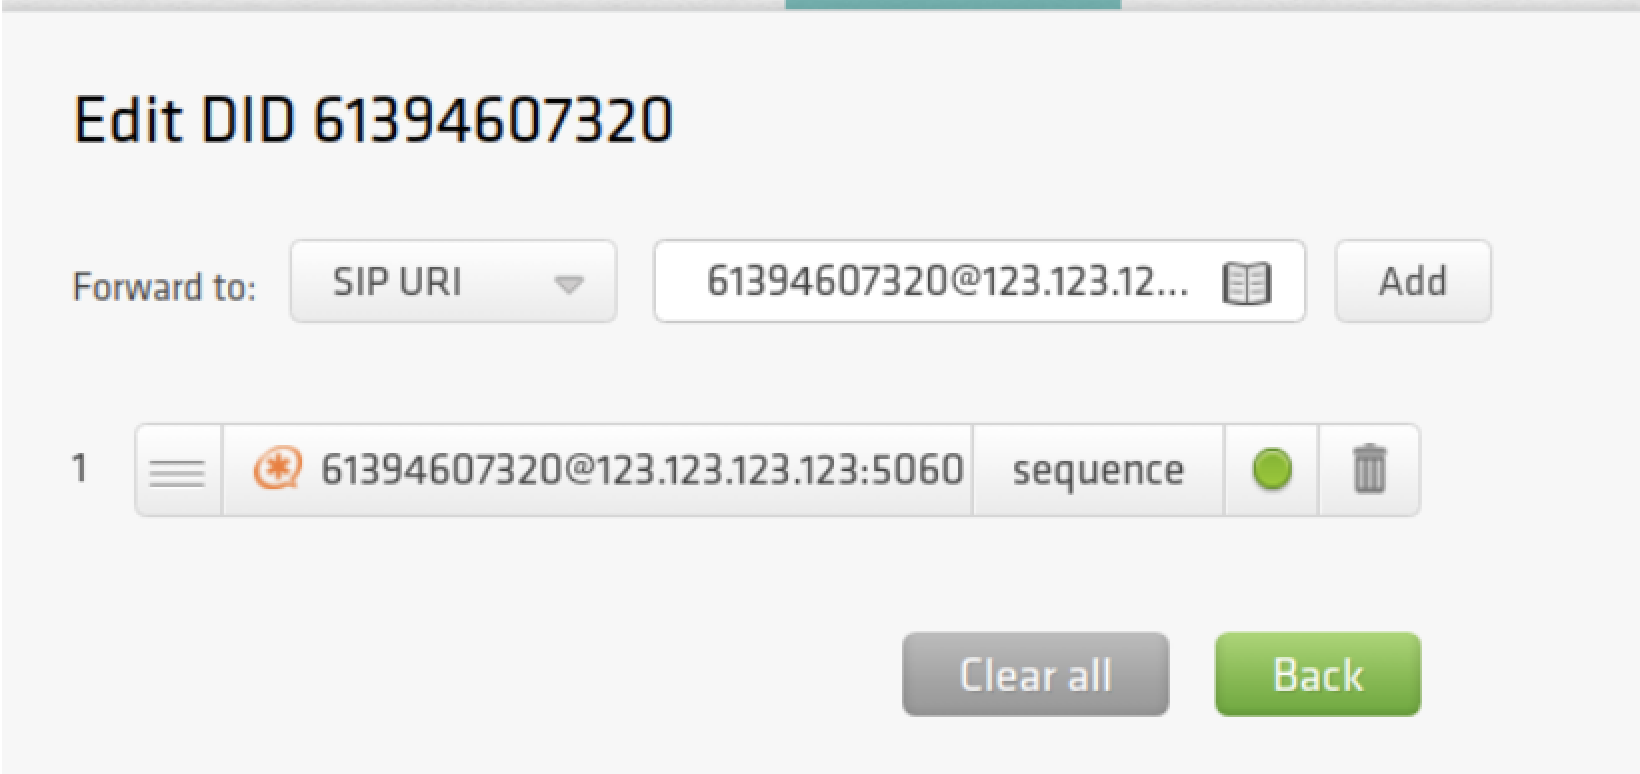
Let's say your FreeSWITCH IP Address is 123.123.123.123. Then, follow the steps:
-
Update vars.xml
/usr/local/freeswitch/conf/vars.xml-
add the line:
<X-PRE-PROCESS cmd="set" data="outbound-sip-ip=123.123.123.123"/> -
edit the lines
<XPREPROCESS cmd="stun-set" data="external_rtp_ip=123.123.123.123"/><XPREPROCESS cmd="stun-set" data="external_sip_ip=123.123.123.123"/>
-
-
Uncomment the lines for "ext-rtp-ip" and "ext-sip-ip" in
/usr/local/freeswitch/conf/sip_profiles/external.xmland set them as a reference to the variables in vars.xml.
<param name="ext-rtp-ip" value="$${external_rtp_ip}"/><param name="ext-sip-ip" value="$${external_sip_ip}"/> -
Create an external SIP profile at
/usr/local/freeswitch/conf/sip_profiles/external/didlogic_ip.xml<include>
<gateway name="didlogic_ip">
<param name="proxy" value="sip.se.didlogic.net"/>
<param name="register" value="false"/>
<param name="context" value="didlogic_ip"/>
<param name="caller-id-in-from" value="true"/>
<param name="sip_cid_type" value="none"/>
<param name="retry-seconds" value="30"/>
<param name="expire-seconds" value="600"/>
</gateway>
</include> -
Add the following line to the dialplan file:
<action application="set" data="sip_from_host=${outbound-sip-ip}"/>
and change the context as follows:<?xml version="1.0" encoding="UTF-8"?>
<include>
<context name="didlogic_ip">
<extension name="unloop">
<condition field="$${unroll_loops}" expression="^true$" />
<condition field="${sip_looped_call}" expression="^true$">
<action application="deflect" data="${destination_number}" />
</condition>
</extension>
<extension name="out-didlogic_ip">
<condition field="destination_number" expression="^(\d{10,15})$">
<action application="set" data="sip_from_host=${outbound-sip-ip}"/>
<action application="bridge" data="sofia/gateway/didlogic/$1"/>
<action application="export" data="sip_from_uri=${sip_from_uri}"/>
<action application="hangup"/>
</condition>
</extension>
<extension name="in-didlogic">
<condition field="destination_number" expression="^(61394607320)$">
<action application="bridge" data="user/1000@$${domain}"/>
<action application="hangup"/>
</condition>
</extension>
<extension name="local">
<condition field="destination_number" expression="^\d{4}$">
<action application="answer" />
<action application="sleep" data="1000" />
<action application="bridge" data="user/${destination_number}@$${domain}" />
<action application="hangup" />
</condition>
</extension>
</context>
</include>
Now outbound calls should work.
Configuration with Caller ID Passthrough
When configuring SIP Account settings on the didlogic portal, you normally assign one of the purchased DID numbers as the Caller ID.
If you want to use your own A-numbers and send them directly from FreeSWITCH, first contact your account manager or email [email protected] and request Caller ID passthrough activation. Note that this feature may be unavailable depending on individual eligibility.
Once your request is approved and the feature is enabled, remove the Caller ID assigned to your SIP Account to allow Custom Caller ID passthrough: go to the SIP account settings, clear the Caller ID field, and save changes.
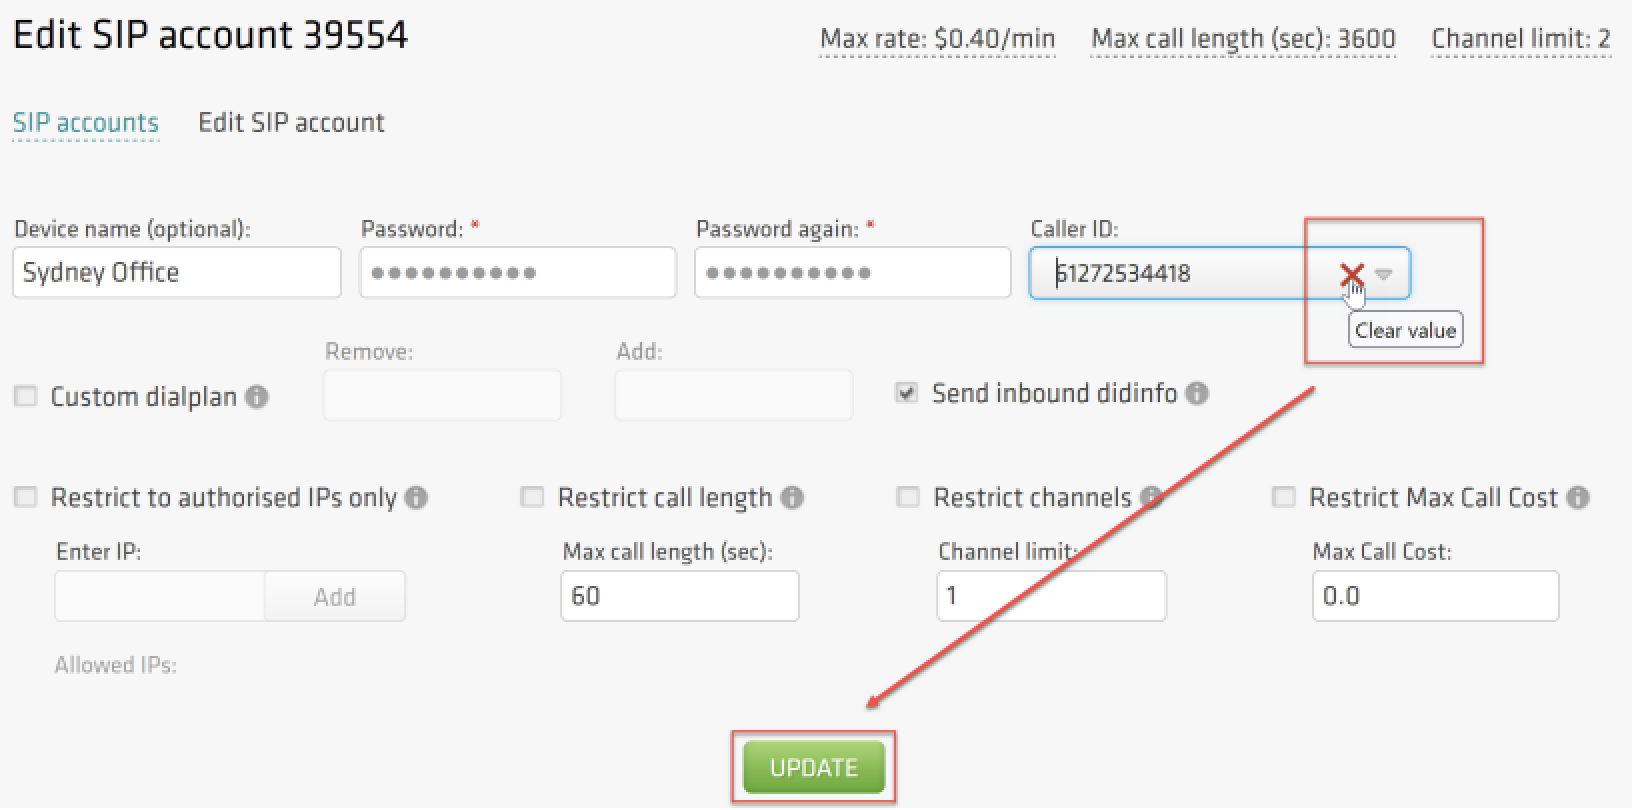
You should see your SIP Account updated:
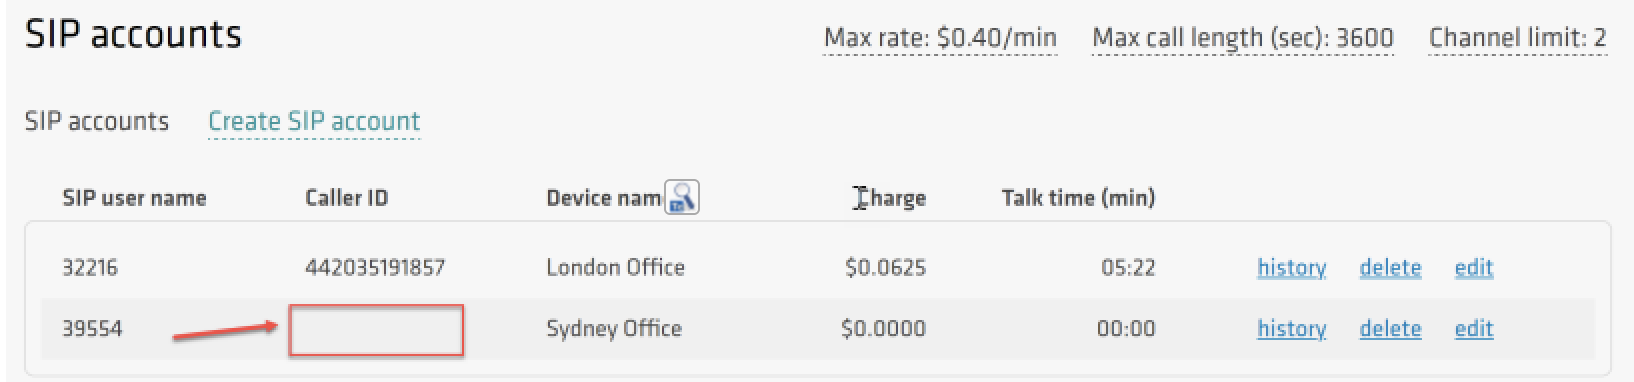
If there is no Caller ID associated with the SIP Account while Caller ID passthrough is disabled, your outbound calls will be passed over the public network with Anonymous Caller ID. Anonymous calls tend to be routinely deprioritized and may even be barred by carriers.
Custom Caller ID on FreeSWITCH
-
Update your external SIP profile with new parameters:
/usr/local/freeswitch/conf/sip_profiles/external/didlogic.xml<include>
<gateway name="didlogic">
<param name="username" value="39554"/>
<param name="password" value="YOUR_SIP_ACCOUNT_PASSWORD"/>
<param name="proxy" value="sip.se.didlogic.net"/>
<param name="expire-seconds" value="600"/>
<param name="register" value="true"/>
<param name="retry-seconds" value="30"/>
<param name="context" value="didlogic"/>
<param name="caller-id-in-from" value="true"/>
<param name="sip_cid_type" value="none"/>
</gateway>
</include> -
You can set Caller ID in the extension configuration file using option 'effective_caller_id_number':
/usr/local/freeswitch/conf/directory/default/1000.xml<include>
<user id="1000">
<params>
<param name="password" value="YOUR_EXTENSION_PASSWORD"/>
<param name="vm-password" value="1000"/>
</params>
<variables>
<variable name="toll_allow" value="domestic,international,local"/>
<variable name="accountcode" value="1000"/>
<variable name="user_context" value="didlogic"/>
<variable name="effective_caller_id_name" value="CALLER_ID_NAME"/>
<variable name="effective_caller_id_number" value="61272534418"/>
<variable name="outbound_caller_id_name" value="$${outbound_caller_name}"/>
<variable name="outbound_caller_id_number" value="$${outbound_caller_id}"/>
<variable name="callgroup" value="techsupport"/>
</variables>
</user>
</include>
Failover Routing
In the world of VoIP and telecom, uptime isn't just a technical metric - it is directly tied to business revenue. A recent outage on a primary proxy (such as the performance degradation seen on sip.de) can result in immediate traffic drops, missed client calls, and lost revenue within just a few hours. The most effective strategy is to build resilience directly into your Private Branch Exchange (PBX).
To guarantee uninterrupted voice traffic, we highly recommend implementing an Active Failover architecture on your FreeSWITCH PBX. This guide demonstrates how to configure your system to dynamically monitor our regional gateways (e.g., sip.de.didlogic.net and sip.uk.didlogic.net) and seamlessly reroute outbound calls if the primary route becomes unavailable.
Inbound Failover
To protect against inbound call disruptions, we'll use dual registrars. First, let's allow FreeSWITCH to process incoming calls from both regional gateways:
-
Create a failover profile didlogic_fo.xml in the directory, containing external SIP profiles
/usr/local/freeswitch/conf/sip_profiles/external/didlogic_fo.xml:<include>
<gateway name="didlogic_fo">
<param name="username" value="39554"/>
<param name="password" value="<YOUR_SIP_ACCOUNT_PASSWORD>"/>
<param name="proxy" value="sip.nl.didlogic.net"/>
<param name="expire-seconds" value="600"/>
<param name="register" value="true"/>
<param name="retry-seconds" value="30"/>
<param name="context" value="didlogic"/>
<param name="caller-id-in-from" value="true"/>
<param name="sip_cid_type" value="none"/>
</gateway>
</include>
Outbound Failover
By default, a standard PBX configuration only detects a dead gateway after a call attempt fails. This results in long post-dial delays (5–10 seconds of silence) or dropped calls while the system times out.
With Active Monitoring, FreeSWITCH continuously checks the availability of each gateway in the background using SIP OPTIONS PING requests (SIP heartbeats).
- If the primary gateway (sip.de.didlogic.net) fails to respond to pings, FreeSWITCH immediately marks its internal state as DOWN.
- When a user places a call, the dialplan completely bypasses the dead route and instantly bridges the call via the secondary gateway (sip.uk.didlogic.net), ensuring zero call setup delay for your users.
You need to split your trunk configuration into two separate gateway files within your external SIP profile directory. This allows the Sofia SIP stack to track each endpoint independently.
-
Create or edit your primary proxy configuration. Note the active ping parameters at the bottom.
File: /usr/local/freeswitch/conf/sip_profiles/external/didlogic_primary.xml<include>
<gateway name="didlogic">
<param name="username" value="YOUR_SIP_ACCOUNT_ID"/>
<param name="password" value="YOUR_SIP_ACCOUNT_PASSWORD"/>
<param name="realm" value="sip.**.didlogic.net"/>
<param name="register" value="true"/>
<param name="context" value="public"/>
<param name="ping" value="20"/>
<param name="ping-max" value="3"/>
<param name="ping-min" value="1"/>
<param name="retry-seconds" value="30"/>
</gateway>
</include> -
Create a symmetric configuration for the backup node. If the Primary gateway encounters issues, traffic will shift here.
File: /usr/local/freeswitch/conf/sip_profiles/external/didlogic_backup.xml<<include>
<gateway name="didlogic_backup">
<param name="username" value="YOUR_SIP_ACCOUNT_ID"/>
<param name="password" value="YOUR_SIP_ACCOUNT_PASSWORD"/>
<param name="realm" value="sip.**.didlogic.net"/>
<param name="register" value="true"/>
<param name="context" value="public"/>
<param name="ping" value="20"/>
<param name="ping-max" value="3"/>
<param name="ping-min" value="1"/>
<param name="retry-seconds" value="30"/>
</gateway>
</include>sip.***.didlogic.net - instead of ***, please select one of the DID Logic regional SIP gateways. You can find a full list of our regional gateways here. We recommend selecting a regional gateway with the lowest latency from your public IP address.
-
Once Sofia is actively tracking gateway states, configure your outbound dialplan to evaluate these states sequentially.
By using the pipe character (|) inside the bridge application data string, you instruct FreeSWITCH to instantly execute a failover if the first gateway is dead or returns a temporary network failure.
File: /usr/local/freeswitch/conf/dialplan/default/didlogic_dialplan.xml
<?xml version="1.0" encoding="UTF-8"?>
<include>
 <context name="didlogic">
   <extension name="unloop">
     <condition field="$${unroll_loops}" expression="^true$" />
     <condition field="${sip_looped_call}" expression="^true$">
         <action application="deflect" data="${destination_number}" />
     </condition>
   </extension>
   <extension name="in-didlogic">
     <condition field="destination_number" expression="^(61272534418)$">
         <action application="bridge" data="user/1000@$${domain}"/>
         <action application="hangup"/>
     </condition>
   </extension>
   <extension name="out-didlogic">
     <condition field="destination_number" expression="^(\d{10,15})$">
         <action application="bridge" data="sofia/gateway/didlogic/$1|sofia/gateway/didlogic_backup/$1"/>
         <action application="export" data="sip_from_uri=${sip_from_uri}"/>
         <action application="hangup"/>
      </condition>
   </extension>
   <extension name="local">
     <condition field="destination_number" expression="^\d{4}$">
         <action application="answer" />
         <action application="sleep" data="1000" />
         <action application="bridge" data="user/${destination_number}@$${domain}" />
         <action application="hangup" />
     </condition>
   </extension>
 </context>
</include>
- To apply your modifications live without dropping ongoing active calls, execute the following commands in your system terminal or FreeSWITCH CLI.
-
Reload the XML Tree
fs_cli -x "reloadxml" -
Rescan the External SIP Profile
This forces the system to detect the new gateway files and start background heartbeats:
fs_cli -x "sofia profile external rescan" -
Monitor Status Values
Verify the operational state of your redundant gateways by running:
fs_cli -x "sofia status"
Your gateways output should display the REGED state:
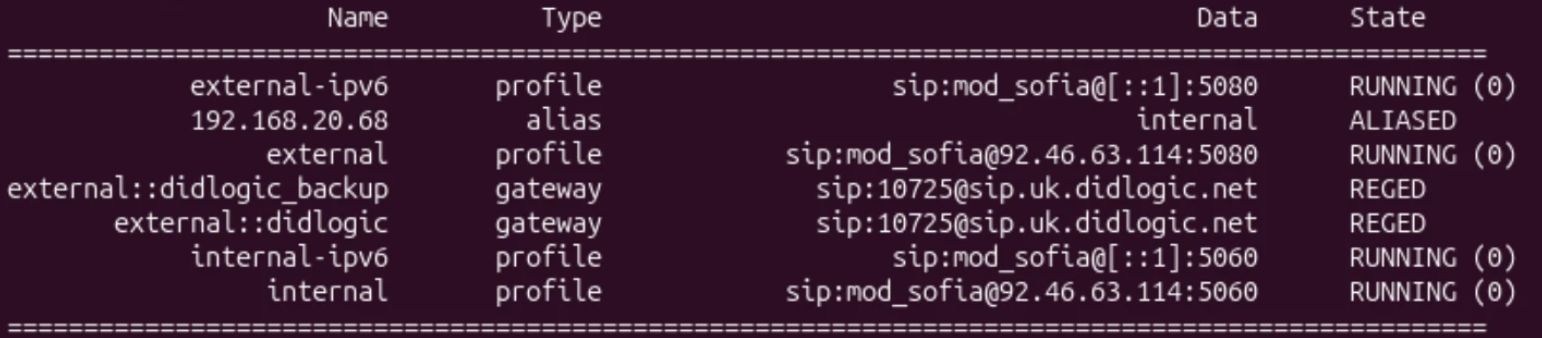
- REGED confirms successful registration with our proxy.
- (VAp) stands for Valid, Active, and Pingable. If the Main gateway goes offline, its state will change to NOREG, and your outbound dialplan will seamlessly use the Backup gateway exclusively until the Main node responds to pings again.
Common issues
Common issues with outbound calls
- 603 Declined response might be caused by the lack of active registration. Check registrations as outlined below
- Another typical reason for the 603 Declined is a call to the destination with the per-minute rate higher than the Max rate set for your account. You can find your effective Max rate on the SIP tab. If you would like to have it changed, please contact [email protected].
- Incorrect destination number format. For example, dial the full international number (E.164): 12125551212 (US), 442085000000 (UK). Dialing 2125551212 won't work. Do not dial with 0, 00, or 011 in front.
Common issues with inbound calls
- Make sure your internal extensions to which incoming calls are forwarded are registered. To check registrations, enter the command "show registrations" in the fs_cli command prompt:

- When FreeSWITCH is behind a firewall, you may experience one-way audio. didlogic has numerous media gateways across the globe, and the IP addresses change occasionally, so you should allow RTP traffic originating from any IP with source ports 10000-20000 in your firewall configuration.
- If you are experiencing issues with call setup, we recommend using the sngrep tool to monitor SIP signaling. You can use various filters to drill down into a specific SIP dialog.
Troubleshooting
PCAP extraction
- SSH to your FreeSWITCH server
ssh root@YOUR_FREESWITCH_IP - Enter the FreeSWITCH CLI
fs_cli - Inside fs_cli — run these 4 commands one by one:
pcap start
pcap file /tmp/fs-capture-$(date +%Y%m%d-%H%M%S).pcap
pcap filter "sip or rtp or rtcp" # optional: only SIP/RTP/RTCP
pcap status # you will see: "PCAP active" - Leave the CLI open and reproduce your call/issue
- When finished, stop the capture:
pcap stop - Exit CLI
/quit - Download the .pcap file
scp root@YOUR_FREESWITCH_IP:/tmp/fs-capture-*.pcap .