Avaya
This guide outlines the steps to configure Avaya IP Office PBX to make and receive phone calls using the didlogic trunk provider. Before placing or receiving a call, you should have an active phone number and a SIP account on your didlogic account.
Components used
- Avaya IP Office PBX R9.1
- Avaya IP Office Manager R11.0
Configuring the SIP Line in Avaya
Open Avaya Office Manager and connect to your Avaya PBX. Right-click on the Line → New → SIP Line.
SIP Line Tab
- Put the ITSP domain name:
sip.se.didlogic.net(or any other proxy server address).
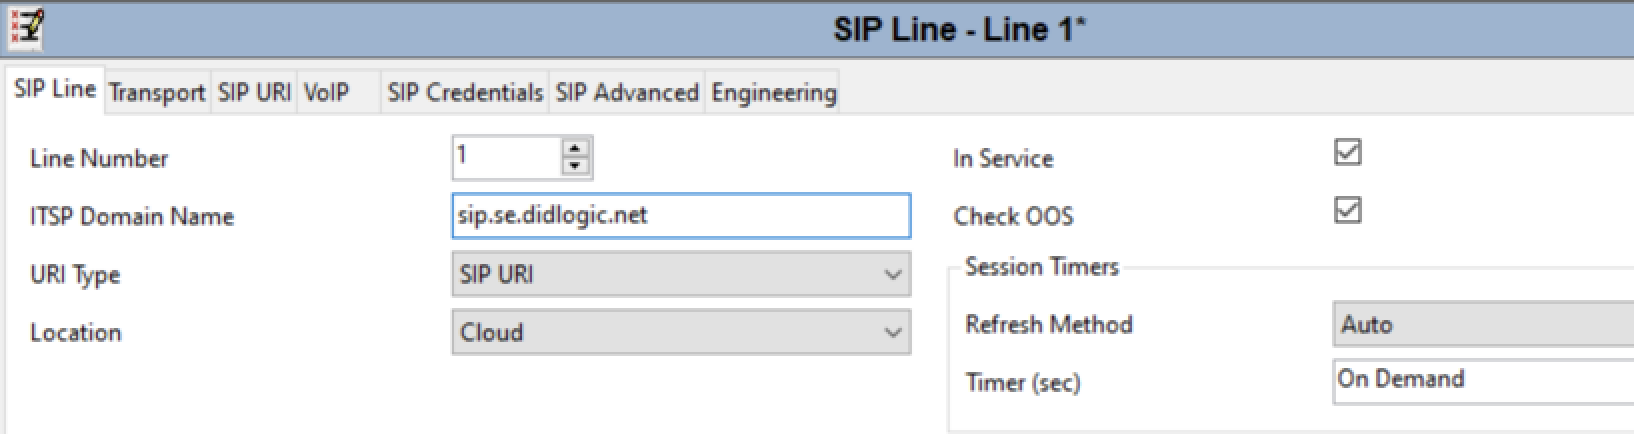
Transport Tab
- ITSP Proxy Address:
sip.se.didlogic.net(enter the same gateway address). - Add your preferred DNS servers.
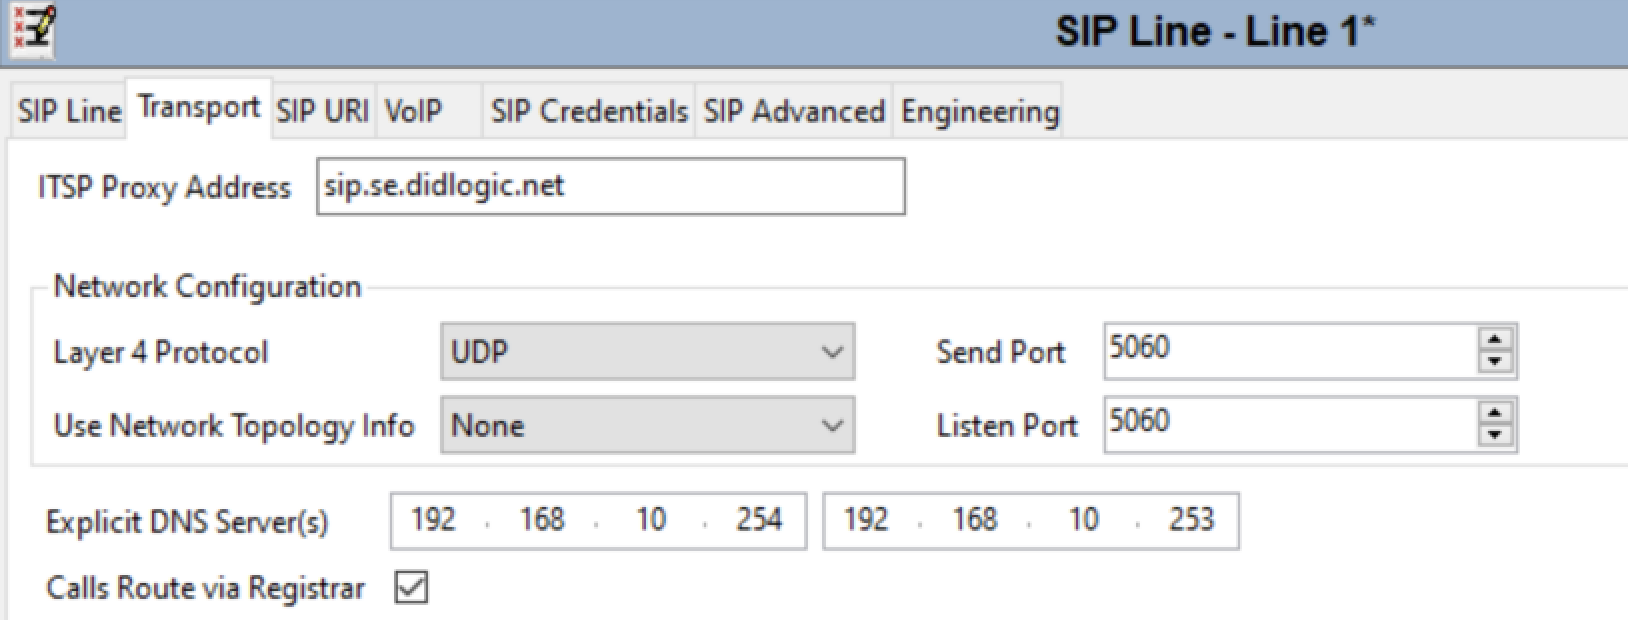
SIP Credentials Tab
Click Add and enter your didlogic SIP account credentials:
- Username / Authentication Name / Contact: Your 5-digit SIP login.
- Password: Your SIP account password.
- Registration required: Checked.
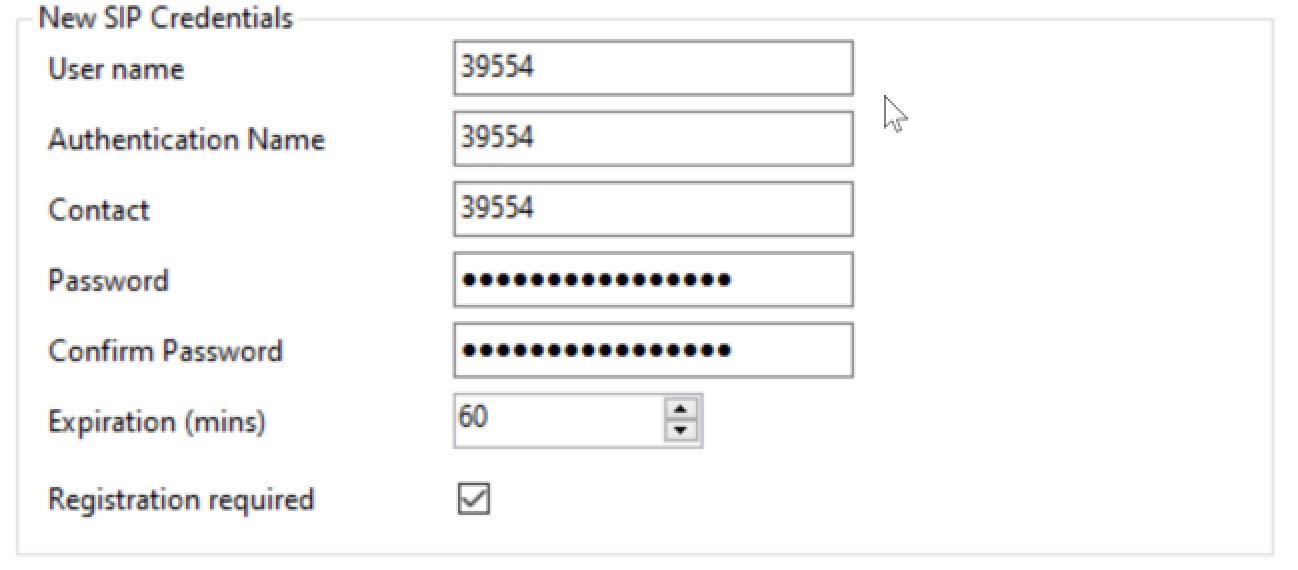
Click OK to add the credentials.
SIP URI Tab
Click Add to map the credentials to the line:
- Registration: Choose SIP credentials from the previous step.
- Local URI / Contact / Display Name: choose Use Credentials User Name.
- Incoming Group / Outgoing Group: set to SIP Line number (1 in this example)
- Max Sessions: set according to your purchased didlogic channel limit.
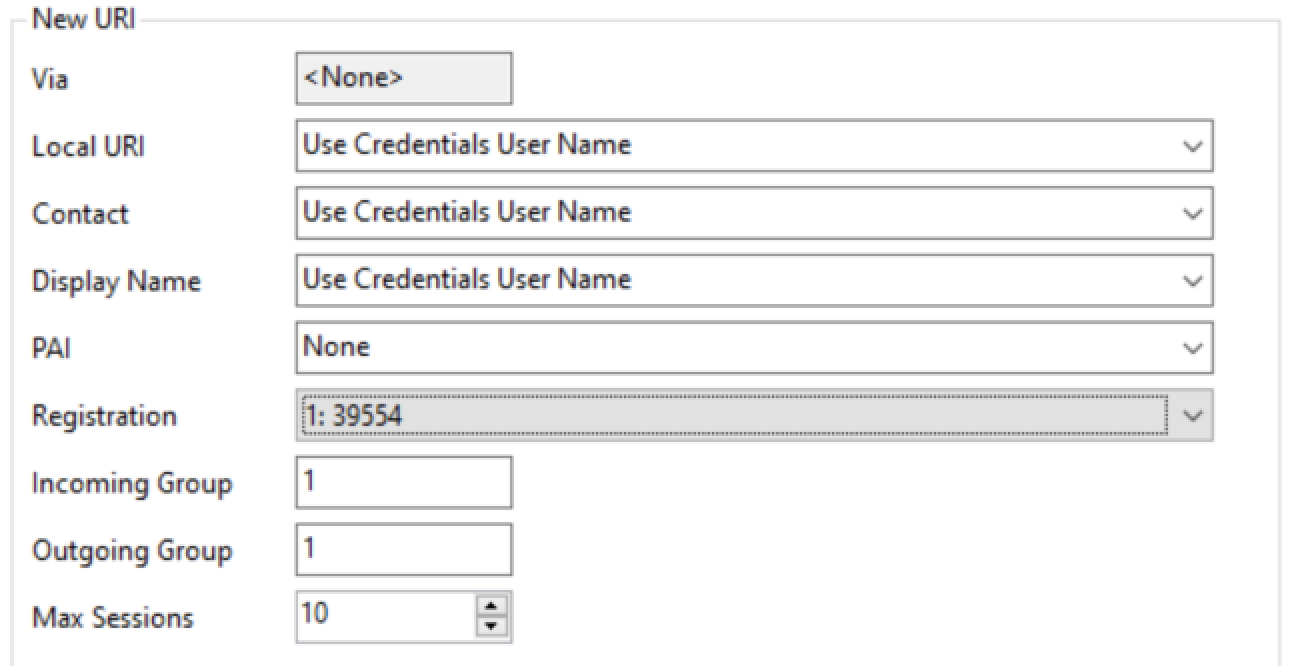
Click OK to save SIP URI settings. Then, click OK to save the SIP Line configuration.
Outbound Calls (ARS Configuration)
To route calls out through didlogic, navigate to ARS → Main. Click Add to create a new ARS entry:
- Code: 0N; (assuming '0' is your prefix for outside lines)
- Telephone Number: N"@sip.se.didlogic.net"
- Line Group ID: SIP Line ID from the previous step (1 in this example)
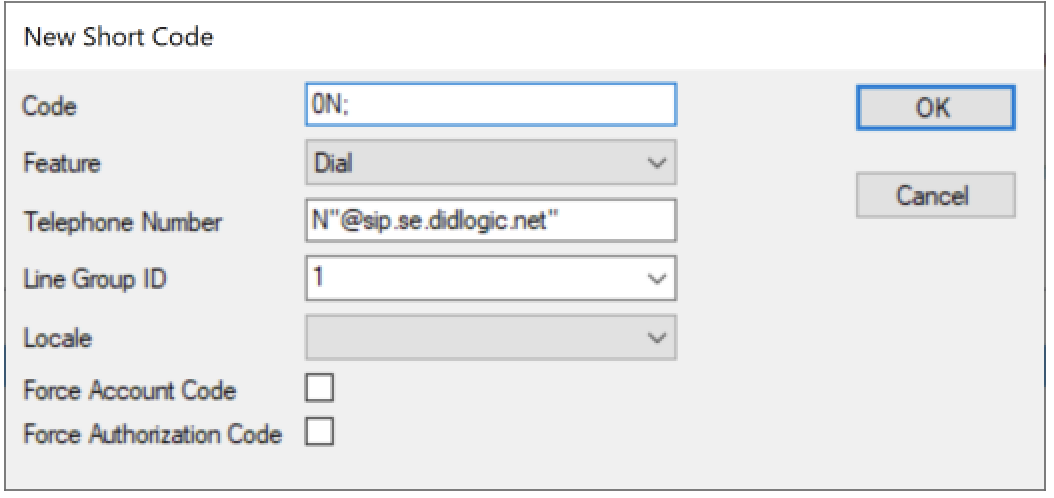
Click OK to add a new ARS Entry.
Caller ID Passthrough
When configuring SIP Account settings on the didlogic portal, you normally assign one of the purchased DID numbers as the Caller ID.
If you want to use your own A-numbers and send them directly from Avaya IP Office, first contact your account manager or email [email protected] and request Caller ID passthrough activation. Note that this feature may be unavailable depending on individual eligibility.
Once your request is approved and the feature is enabled, remove the Caller ID assigned to your SIP Account to allow Custom Caller ID passthrough: go to the SIP account settings, clear the Caller ID field, and save changes.
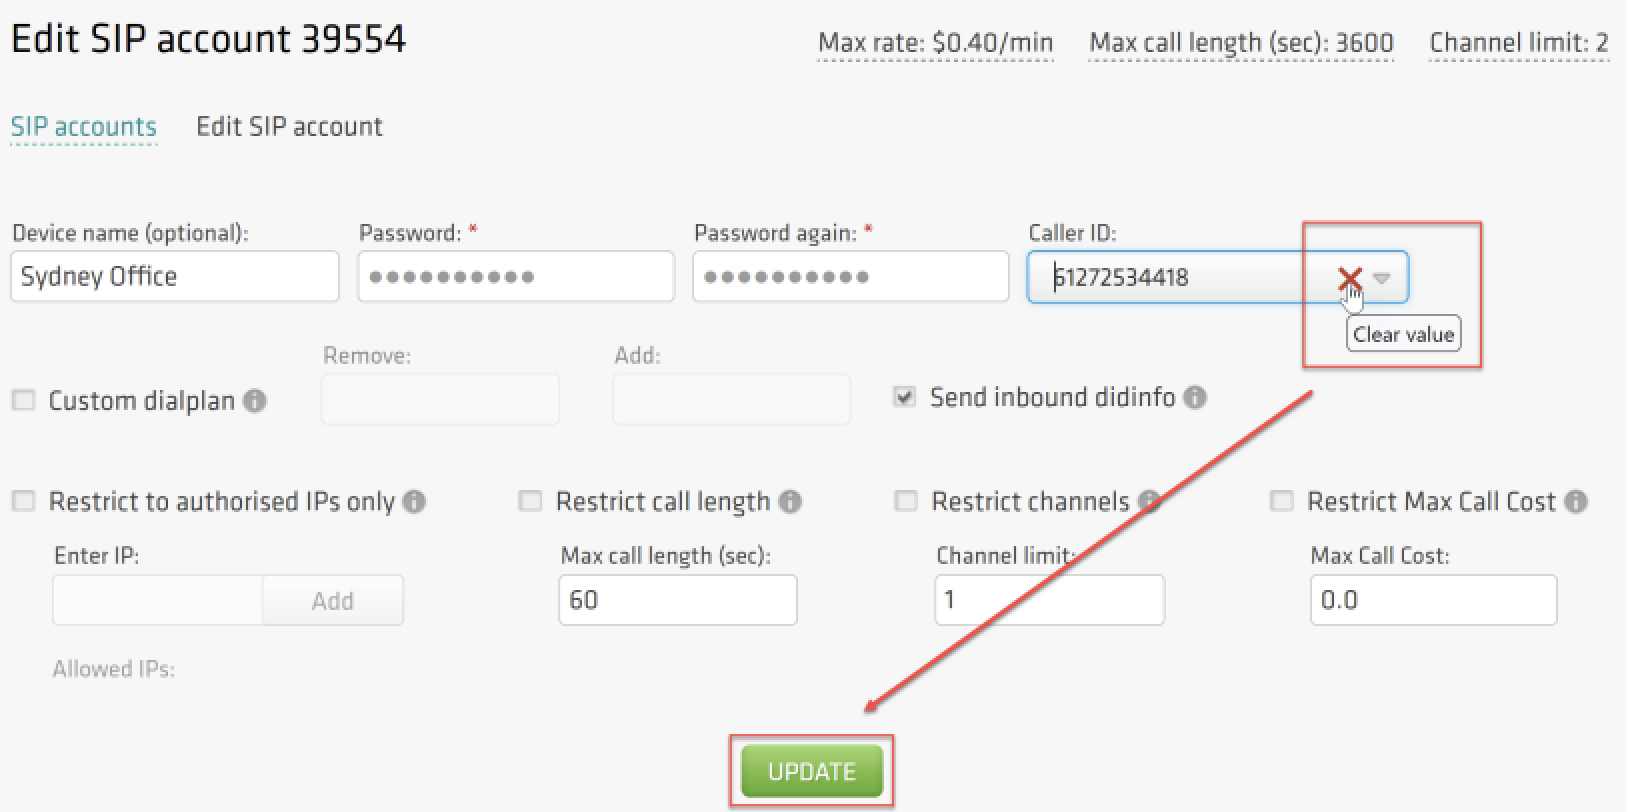
If there is no Caller ID associated with the SIP Account and the Caller ID passthrough is disabled, your outbound calls will be passed over the public network with an Anonymous Caller ID. Anonymous calls tend to be routinely deprioritized and may even be barred by carriers.
In the Avaya panel, select the User you want to set up the Caller ID for, go to the SIP Tab, and set:
- SIP Name / SIP Display Name (Alias) / Contact: your Caller ID

Go to SIP Line configuration, open the SIP URI Tab, click Edit, and set:
- Local URI / Contact / Display Name: Use Internal Data
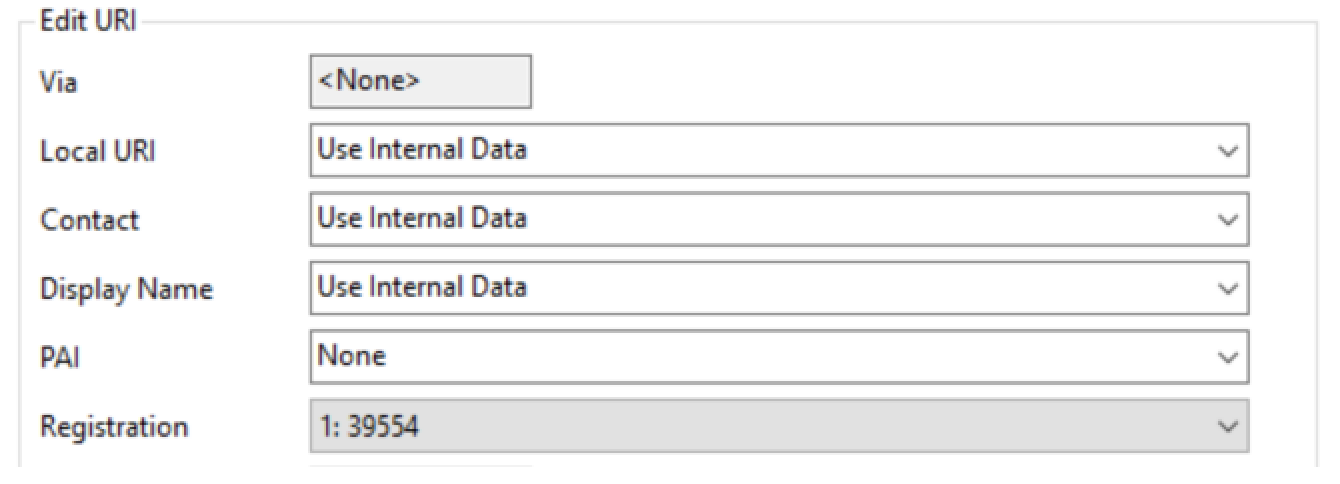
Click OK to save changes.
Inbound Calls
Navigate to the Incoming Call Route. Right-click and select New.
Standard Tab
- Line Group ID: 1 (in this example).
- Incoming Number: Enter your didlogic DID in E.164 format (e.g.,
442085000000)
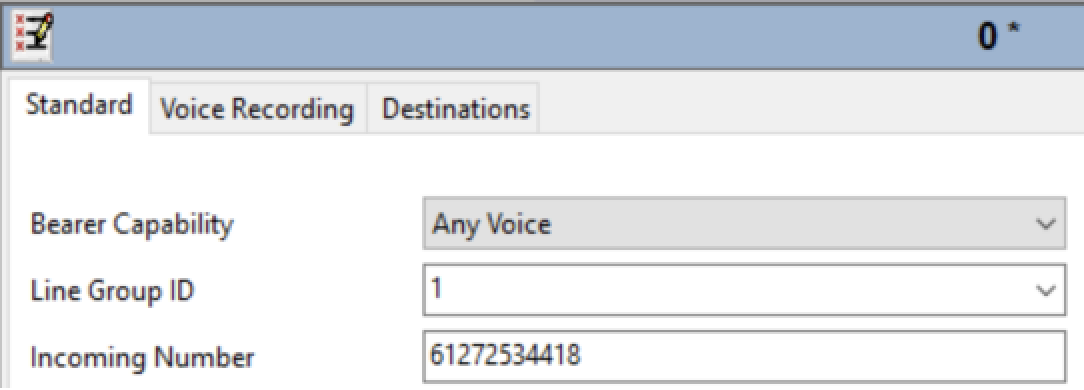
Click OK to save changes.
Destinations Tab
Set the desired Destination and Fallback Extension.

Click OK to save the configuration.
IP Authentication
By default, didlogic responds with 407 Proxy Authentication Required to every SIP INVITE. In the previous steps, we've configured SIP Credentials on the SIP Line to use this authentication method. For high-volume environments, you may prefer IP Authentication over Digest (User/Pass) authentication. In this case, didlogic gateway will accept all outbound calls from the IP address you specify without further authentication.
To set up IP Authentication, please contact [email protected] and provide the public IP Address you will be sending outbound calls from.
SIP Accounts with IP Authentication enabled cannot be used as the destination assigned to DIDs on the portal. SIP URI routing must be used instead.
Go to SIP Line and uncheck Calls Route via Registrar on the Transport Tab.
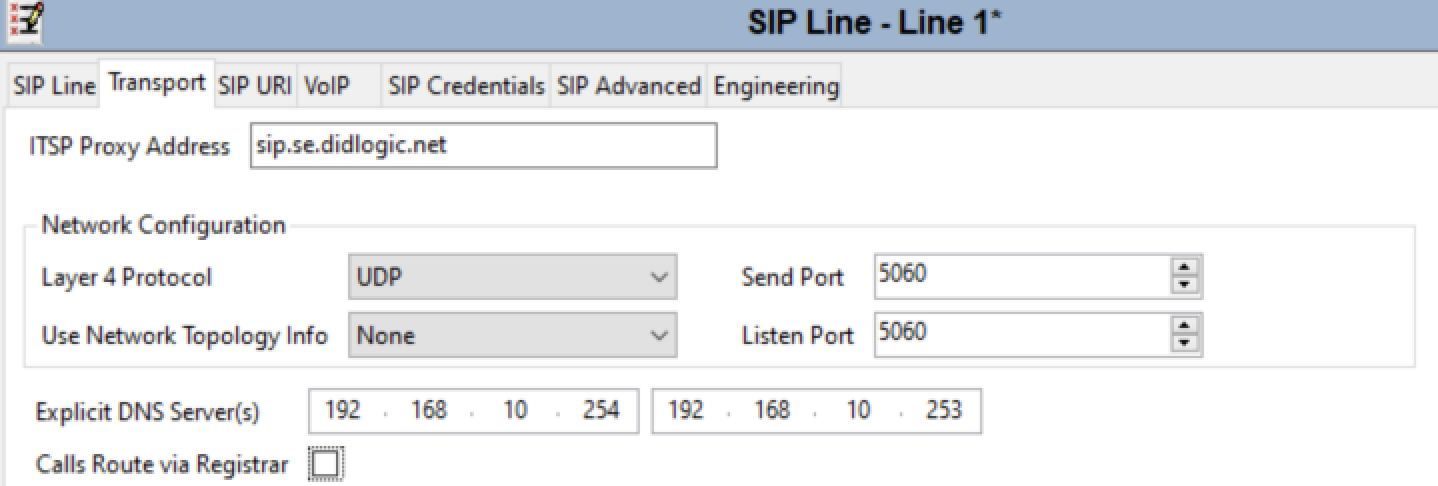
On the SIP Credentials Tab, click Edit and uncheck Registration required.
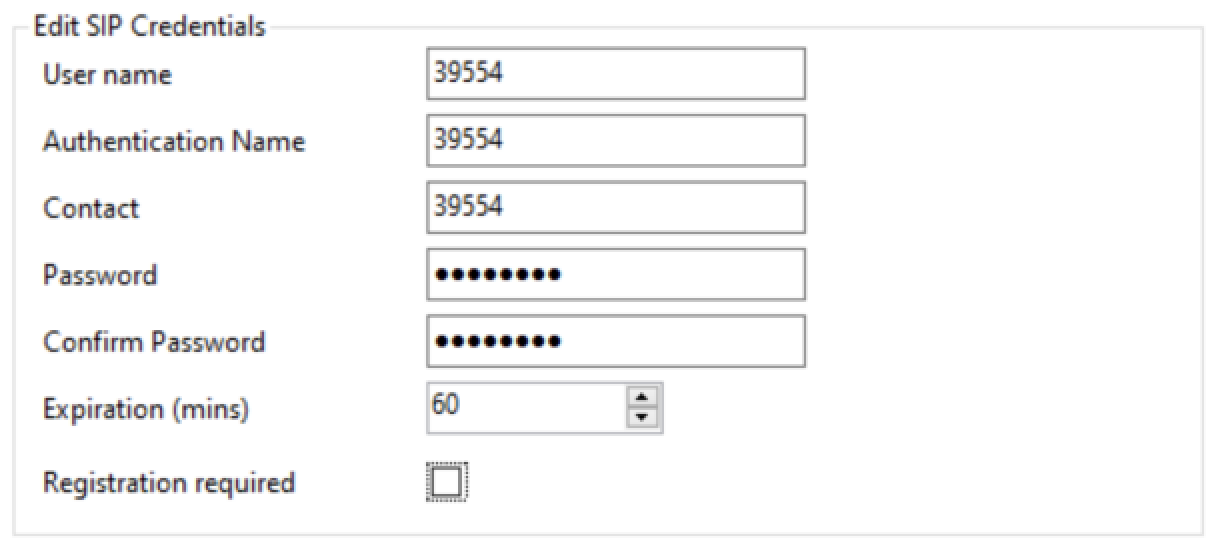
Save SIP Credentials and SIP Line configuration. Your PBX is configured for IP Authentication on the SIP Line.
Failover Strategy
To prevent downtime, set up a secondary SIP Line using a different regional gateway (e.g., if Primary is sip.se.didlogic.net, set Secondary to sip.nl.didlogic.net).
Inbound Failover
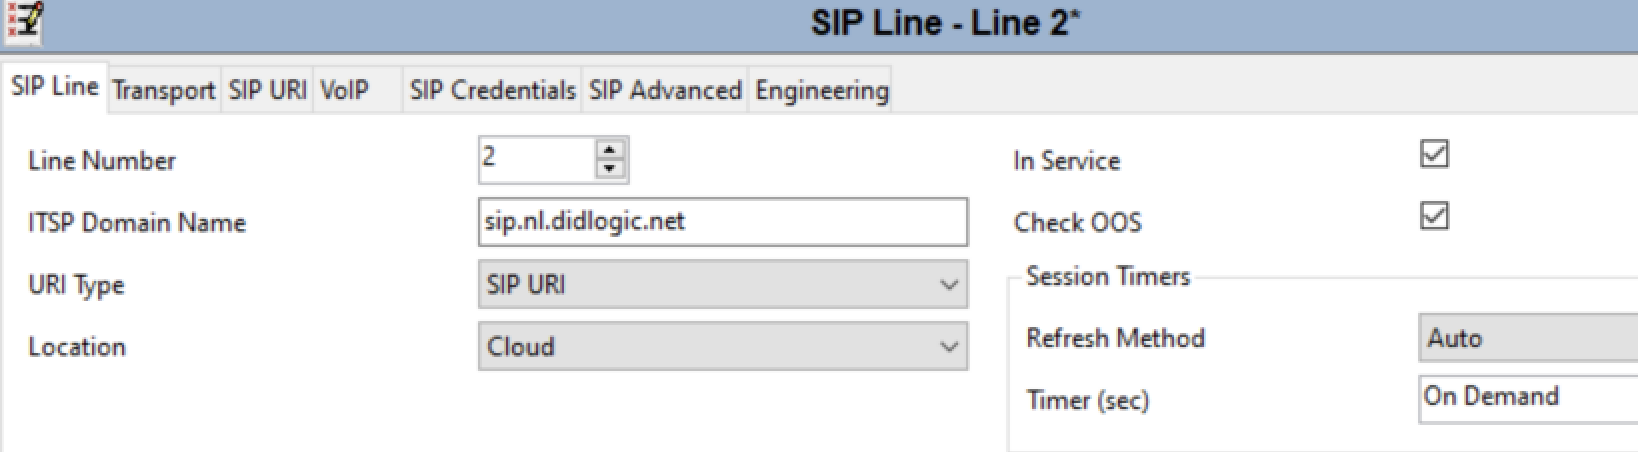
To protect against inbound call disruptions, we'll use dual SIP Line registrations. From the main navigation panel, right-click on the Line → New → SIP Line. On the SIP Tab, configure ITSP Domain Name set as sip.nl.didlogic.net (Secondary Regional SIP Gateway).
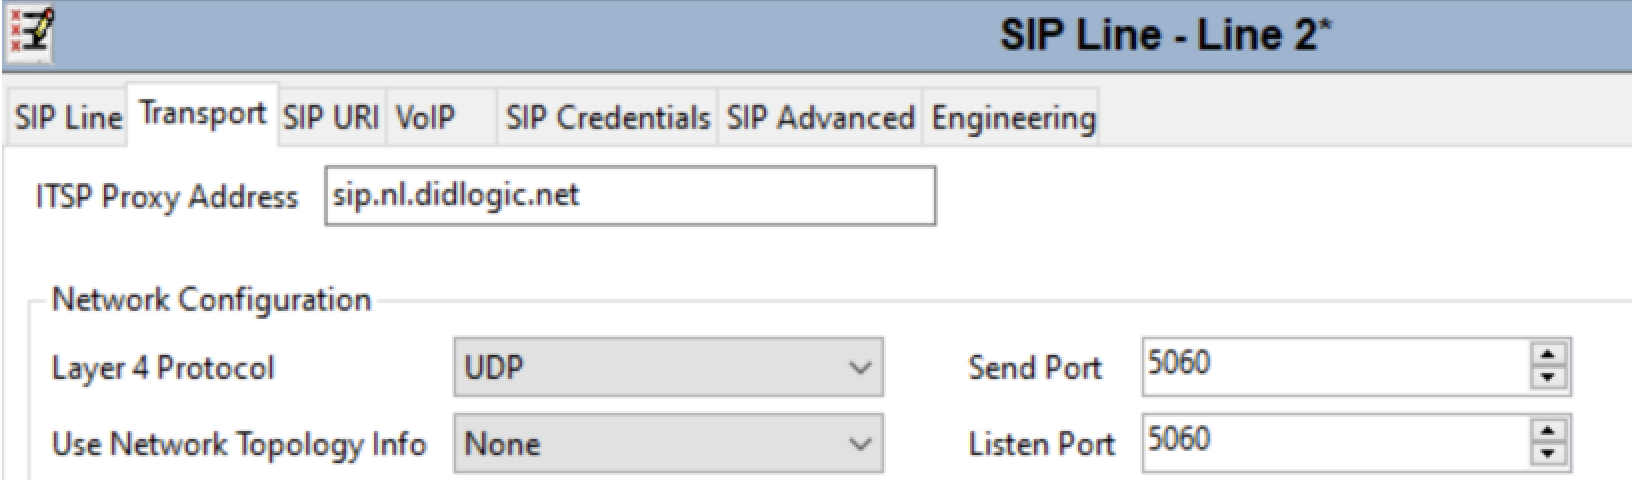
On the Transport Tab, configure ITSP Proxy Address: sip.nl.didlogic.net (Secondary Regional SIP Gateway)
Configure SIP Credentials and SIP URI the same as for the Primary SIP Line and save the configuration.
From the main navigation panel, right-click on the Incoming Call Route and click New.
On the Standard Tab configure:
- Incoming Number: same as for the Primary SIP Line
- Line Group ID: ID of the secondary SIP Line (2 in this example)
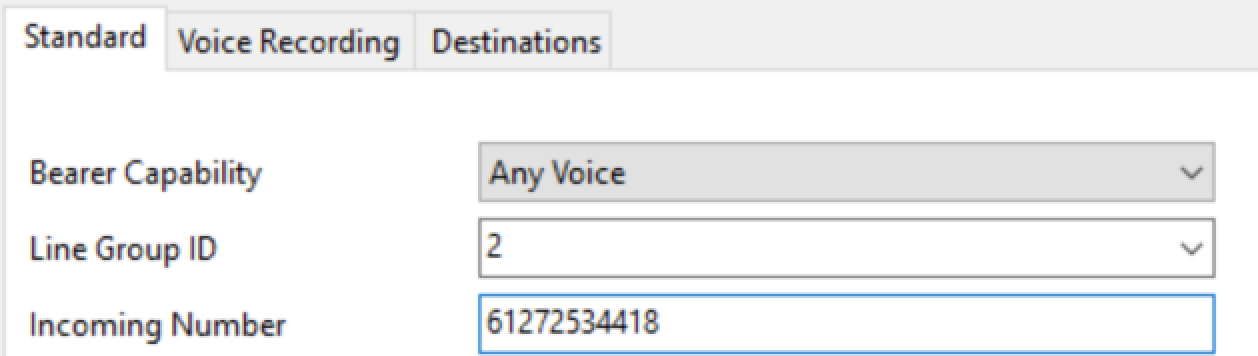
On the Destinations Tab, set Destination and Fallback Extension to the same values as for the incoming calls routing over the Primary SIP Line.

Outbound Failover
From the main navigation panel, go to ARS and configure the new ARS route:
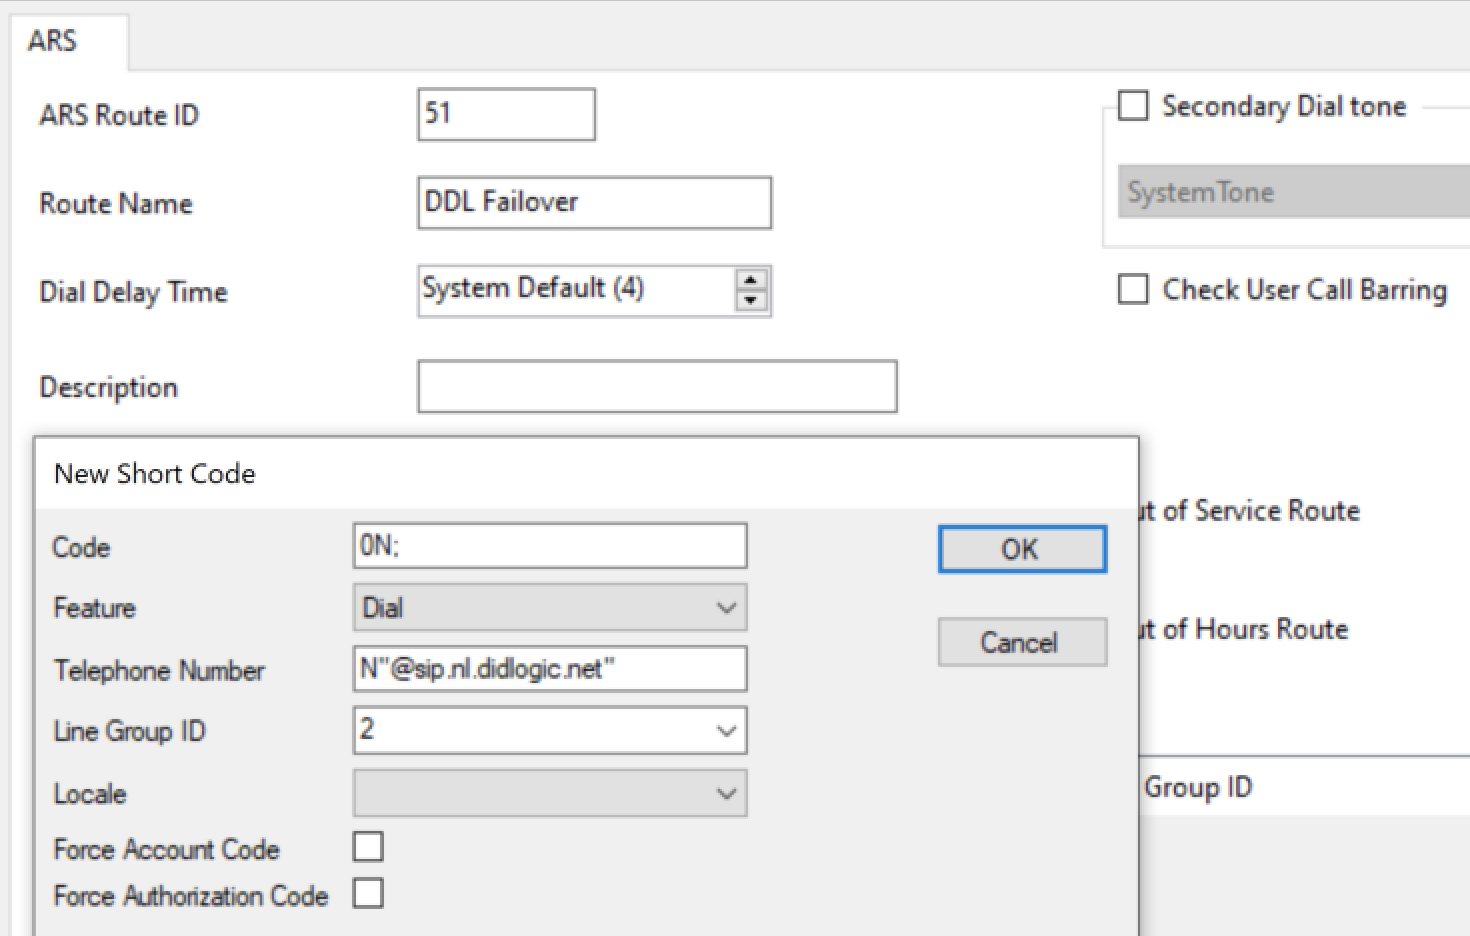
- Route Name: DDL Failover
Click Add to configure New Short Code:
- Code: 0N;
- Telephone Number: N"@sip.nl.didlogic.net"
- Line Group ID: 2 (Secondary SIP Line ID)
Click OK to save Short Code. Then, click OK to save the new ARS route
Edit the main ARS route and configure failover options:
- Out of Service Route: DDL Failover
- Alternate Route: DDL Failover
Click OK to save changes.
Troubleshooting
| Issue | Likely Cause | Solution |
|---|---|---|
| 603 Declined | Registration Failed | Verify that Registration Required is checked and credentials match. |
| 603 Declined | Max Rate Limit | Ensure the destination rate doesn't exceed your account's "Max Rate" setting. If you would like to increase it, please contact [email protected]. |
| No Audio | Firewall/NAT | Ensure UDP ports 10000-20000 are open for RTP traffic. |
| Calls Fail | Wrong Format | Use E.164. Never dial 00 or + unless your ARS handles the conversion. |
| Inbound Calls Don't Come Through | Firewall/NAT or Setup Issue | Make sure IP addresses of didlogic regional gateways are allowed on the firewall. Verify the Line Group ID is assigned to both the trunk and the route. Use System Monitor in IP Office to see how the call is presented and troubleshoot format mismatches |